Pages

Tampilkan postingan dengan label in. Tampilkan semua postingan

Jumat, 01 November 2013

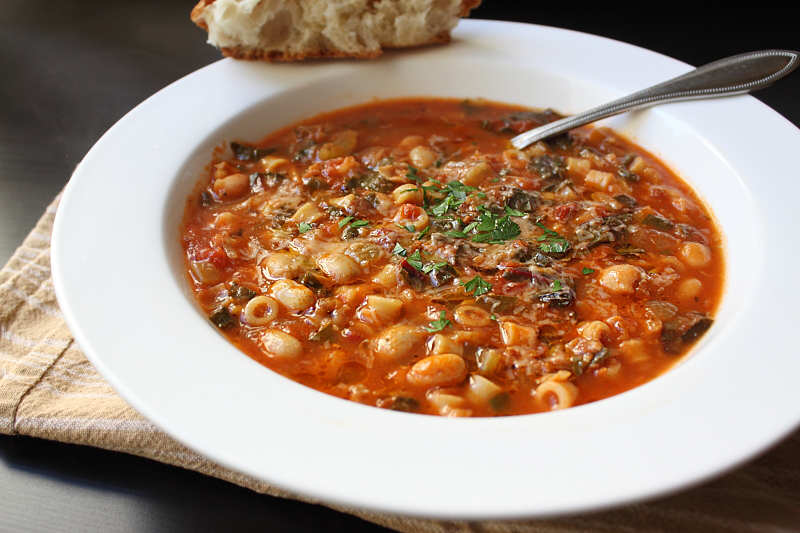
Minestrone Soup is a Once in a Lifetime Experience

I always feel a little apprehensive when I post a recipe like this minestrone soup. It’s the type of dish I never make the same way twice, and the fear is that someone will watch and assume that this is my “official” version.

You don’t need a recipe for minestrone, just like you don’t need a recipe for a great sandwich, or an epic salad. To make minestrone soup precisely same way every time, using a very specific list of ingredients and amounts, is to trample on the soul of this Italian classic.

Having said all that, what if you happen to make it so incredibly delicious one time that you want to experience the exact same shuddering soupgasm in the future? That seems like a perfectly sound reason for why you should write down the recipe…except cooking food doesn’t work that way.

Your perception of how a recipe tastes involves so many factors above and far beyond the list of ingredients. Remember that time you made that super awesome whatever, and it was so perfect, and then you made it again, exactly the same way, but somehow it just didn’t taste as great? This is why.

So, I hope you give this amazing minestrone recipe a try soon…but only once. Enjoy!


Ingredients:
3 oz pancetta
2 tbsp olive oil
1 diced onion
1 cup diced celery
4 minced garlic cloves
4 cups chicken broth
1 (28-oz) can plum tomatoes, crushed fine
2 cups water, plus more as needed
salt and pepper to taste
1 tsp dried Italian herb blend (mine was thyme, oregano, rosemary, basil)
red pepper flakes to taste
1 cup freshly shucked cranberry beans (aka shelling beans)
2 or 3 cups chopped cabbage
1 (15-oz) can garbanzo beans, drained
1 bunch swiss chard, chopped
2/3 cup raw ditalini pasta
extra virgin olive oil, Parmigiano-Reggiano, and fresh Italian parsley to garnish the top
Read More..

Longevity Noodle in Chicken Broth


My late grandfather told me that people during their time were very poor. They can only have chicken during Chinese New Year, if they can afford it and they look forward to each birthdays because then they will be given an hard-boiled egg (shells dyed red) all to themselves. And if they are lucky, there will be a bowl of Longevity Noodles (长寿面) aka Rice Wheat Noodles (面线) to go with it. They were not suppose to cut or bite the noodles to shorten it because the noodles symbolise longevity. You wouldnt have to shorten your life would you?

Nowadays, people no longer have that for birthday. Perhaps some may not even know the existence of this simple meal. They may not even want to have this for their birthday when they can afford any other food they like. But for me and my husband, its like a tradition. We dont have rich, modernised (read: no cakes) parents. Both our mothers cooked us Longevity Noodles during our birthdays but of course there were chicken, eggs and stuff like that. We are not rich but not that poor either.

So, on my husbands birthday, I took over the role of cooking him this, wishing him health, happiness and of course, longevity.

For those who interested to have this for birthday for a change, its really simple. Blanch noodles before cooking it in broth. Cooking it for 5 minutes is enough. Then just add in the ingredients you like or rather the birthday boy/girl likes. And thats it!

To me its a simple yet meaningful birthday meal, especially if you are cooking it for your elders. Try this, they will appreciate it.

* Longevity Noodle in Chicken Broth with Egg and Abalone *

* the Chicken broth *

Read More..

Selasa, 22 Oktober 2013

Potato Italian Frying Pepper Frittata and How I Learned to Swear in Italian

One of my earliest and fondest food memories is that of my grandfather making frittata. It wasn’t the taste of this hearty, Italian omelet that made such an impression, although that was always wonderful, it was the excitement surrounding “the flip.”

Traditionally, a frittata is cooked about three-quarters of the way, flipped over on to a plate, and slid back into the pan to finish cooking the other side. It’s an hot, slippery exercise fraught with danger, and more than one of his magnificent creations ended up a broken mess. Come to think of it, this is where I first learned how to curse in Italian.

The funny thing is, as long as you have a broiler to finish cooking the top, which he did, you don’t need to flip anything. Just pop it in for a few minutes to firm up the eggs, and brown the cheese, and you’re ready to eat. So, why did he insist on the always risky flip-n-slid?

I’m not exactly sure, but I imagine it was because his father flipped frittatas, and so did his grandfather. That’s just the way they were done, so that’s how he did it. Regardless whether you’re flipping or not, this rustic egg pie was invented for late summer’s vegetable bounty.

If you can fry it in olive oil, it tastes great in a frittata, especially leftover vegetables that would otherwise end up in the trash. It’s also amazing with any kind of summer squash. Just remember that the veggies need to be tender before the eggs go in, since they cook so fast. I hope you give this “memorable” recipe a try soon. Enjoy!


Ingredients for 4 servings:
12 large eggs
1 tbsp olive oil
6 slices of bacon or pancetta
1 1/2 cups sliced peppers
1 1/2 cups cubed, cooked potatoes
OR about 3 cups of any summer veggies
dry or fresh herbs to taste
salt and pepper to taste
hot pepper flakes to taste
2 oz crumbled feta cheese
*Remember to drain oil before adding potatoes and eggs!
Read More..

Senin, 21 Oktober 2013

Clams in Miso 味噌炒蛤蜊


My original plan was to make spicy clams but realised I had some ingredients short. Hence, I decided to tweak the recipe a little.


I had some miso left. I save a little to use on this dish after using some of it to make miso soup my kids.


My husband  could tell I used miso and thought it tasted a little like fermented bean bean but like it anyway.


Ingredients:


  • 1 kg Clams, cleaned and soaked in salted water for 20 mins

  • 1 tablespoon Oil

  • 2 tablespoon minced Garlic

  • 1 tablespoon Miso

  • 2 tablespoon Mirin or Chinese Cooking Wine

  • 1 Red Chilli, de-seeded and chopped

  • 1 teaspoon Sugar

  • Corn Flour Mixture


How to do it:


  1. Heat wok with oil and stir fry garlic and chilli till fragrant.

  2. Add miso and sugar and contine to stir fry for another minute.

  3. Dish everything out.

  4. In the same wok, add in the clams and mirin.

  5. Stir fry for about 5 minutes.

  6. Add in the miso seasoning made earlier.

  7. Stir fry and cook for 1 - 2 minutes.

  8. Remove clams that did not open.

  9. Thicken the sauce with corn flour mixture.

  10. Dish and serve immediately.


Read More..

Minggu, 20 Oktober 2013

Baked Mussels in Garlic Butter 奶油蒜烤青口


 My husband knows I love mussels so when he saw this pack of mussels when we were (supermarket) shopping, he picked it up for me. The first thing he commented was, "You mean mussels are so cheap?!" Yes, the pack of mussels cost only .... $1! Its small though but I prefer this than the larger one.


I used the Garlic Butter Spread I had in the fridge to make this. If you dont have any, you can substitute it with 4 gloves of grated garlic and 1 1/2 teaspoon of garlic powder to 1 1/2 tablespoon of softened butter.


Ingredients:


  • 200g Mussels, washed & cleaned

  • 3 clove Garlic, chopped

  • 1 1/2 tbsp Garlic Butter Spread

  • 1 teaspoon Dried Mixed Herbs

  • 1 teaspoon Dried Parsley

  • A pinch of Salt

  • A dash of Ground Black Pepper


How to do it:


  1. Mix all ingredients except Mussels, salt and ground black pepper together.

  2. Combine butter mix with mussels. 

  3. Season with salt and ground black pepper.

  4. Bake in oven at 200C for 15 - 20 minutes or till all mussels are cooked.

  5. Serve immediately.


Read More..

Selasa, 15 Oktober 2013

Fried Fish in Soy Sauce

I havent buy (whole) Groupa for a long time as it too big to fit into my small pan wok for cooking. I got one anyway and told the fishmonger to get the smallest he can find. :P He even butterfly it for me.

Ill be lucky if I can get the whole fish in. Thats the problem with having a small wok.

My original plan was to try to replica the home-made fried tofu we always have at the Soup Restaurant. But Im really lousy in frying beancurd. Im still practicing though. I will share my way of doing it if I ever master it. :P

Anyway, I gathered that the sauce which was inspired by the fried tofu dish I mention should goes well with fried fish too. But be prepared to clean up the kitchen after this. Okay, okay, the oil spat is only the initial part so you probably need to only clean the wall and a small part of the floor. ;)

Ingredients:
  • 1 Groupa, cleaned
  • 1/4 teaspoon Salt
  • Corn Flour for dusting
  • Oil for frying

Garnish:
  • 1 - 2 tablespoon Dried Shrimps, fried till crispy
  • lots of Spring Onions and Coriander

Sauce:
  • 1 tablespoon Light Soy Sauce
  • 5 tablespoon Water
  • 1 tablespoon Brown Sugar
  • 1 tablespoon Cooking Wine

How to do it:
  1. Rub salt over fish.
  2. Give the fish a few parallel cuts on both side to help faster cooking.
  3. Dust whole fish with cornflour.
  4. When oil is hot (not smoking), carefully slide fish in.
  5. Gently scoop oil and pour over the top of the fish, if you dare too. ;) The oil is hot but not splatting.
  6. Slowing turn the fish over once the bottom is nicely brown about 4 minutes for mine.
  7. Continue frying for another 3 minutes or till cooked and skin is brown.
  8. Drain away oil and place on a dish.
  9. Put fried dried shrimps, spring onions and coriander on fish.
  10. Combine all ingredients for the sauce in a saucepan and bring to a boil.
  11. Pour over fish.
  12. Drizzle on some sesame seed oil and serve immediately.


Read More..

Jumat, 04 Oktober 2013

Flour Vermicelli in Thick Soup


Many many years ago when I was still working, my friend brought me to Alexandra Market and ordered this Flour Vermicelli. Its unlike what we usually take which requires the use of chopsticks. The vermicelli is all crushed and all you need is a spoon and the soup is in thick form.

In Chinese, its called 面线糊. Its kind of like what Shihlin has but I had this many year before Shihlin came to Singapore and I have not been to Taiwan either. So to me this was the original.

I had no idea how it was done but I came up with my own verison. The idea came from the Little Bowl Fins. This is also one of my Saturday dinner because it is fast and easy to cook. But be warned. The vermicelli will expand so its advisable to cook this when you are ready to eat.

Ingredients:
  • 2 bunch of Rice Vermicelli, crushed
  • 10 Fresh Shitake Mushroom, sliced
  • 10 Scallops, sliced halfed and blanched
  • 750ml Chicken Broth
  • Cornflour Mixture (Thickener)

Seasonings:

  • 1 teaspoon Sugar
  • 1 teaspoon Salt
  • 1 teaspoon Light Soy Sauce
  • 1/2 tablespoon Chinese Cooking Wine
  • 1/2 tablespoon Oyster Sauce
  • 1 teaspoon Sesame Seed Oil

How to do it:

  1. Add mushroom to the broth and bring to a boil.
  2. Add in seasonings.
  3. In another pot with, add in a teaspoon of oil and bring to a boil.
  4. Add in the crushed Rice Vermicelli.
  5. Gently stir while cooking.
  6. Drain after 2 minutes of cooking.
  7. Add the Rice Vermicelli to the broth.
  8. Gradually add in thickener, when the soup begins to boil.
  9. Add the scallops to cook for 20 seconds or till thoroughly cooked.
  10. Serve.
Note:
The ingredients is used here are whatever I find in my fridge.
You can add (cooked) shredded chicken instead of scallops. Add in before thickening the soup.

  • Click HERE for printer-friendly version of an original recipe.


Read More..

Rabu, 02 Oktober 2013

In Defense of Rounded Wooden Spoons and Being Wrong in the Kitchen

There are few food folks I enjoy and respect more than Michael Ruhlman. He’s a celebrated, award-winning author; an influential and generous member of the food blogging community; and my favorite Iron Chef judge (best perplexed look in the biz). 

However, in this amusing “Had Something to Say” video, produced by friends Diane and Todd from White on Rice, Mr. Ruhlman reminded me why, when it comes to cooking at least, being right isn’t as important as being happy.

Everything Michael says about the rounded wooden spoon’s design in this “Stupid Kitchen Tools” video is correct. A squared-off, flat-edged wooden spoon is the superior stirring implement, but that doesn’t change the fact that my mother used a rounded wooden spoon, which was the same one that my grandmother used, which was exactly like the one that my great grandmother used.

So for me, it looks right, feels good in my hand, and contrary to what Mr. Ruhlman believes, serves as the perfect tasting instrument – lovingly associated with all kinds of delicious memories. I’m sorry, but tasting spaghetti sauce off a square wooden spoon is like a chef using oven mitts instead of kitchen towels; it works, but it’s just not a great look.

Squares and right angles are the work of man. It’s the shape of industry, not art. Nature is round, food is round, and people are, well, you know. Cooking equipment, like life itself, is much more about what you want, than about what you need. Our brains may grab for the square wooden spoon, but the soul of a cook reaches out for the rounded one every time. What say you?

Sincere thanks to Michael Ruhlman, and to Todd & Diane for sharing this great video with us! You can follow this link to get more information and read their original post. Enjoy!

Read More..

Kamis, 19 September 2013

Garlic Shrimp – Not Necessarily In That Order

The great thing about posting a recipe as generic as “Garlic Shrimp,” is that nobody can complain it’s not authentic. If it has shrimp and enough garlic in it, it’s authentic. Above and beyond that, just about anything goes.

The only real debate revolves around whether to cook shrimp first, and then add the garlic; or sauté the garlic first, and then cook the shrimp. I’ve used and enjoyed both methods, but I think I prefer the one shown here.

If you cook the garlic first, it mellows out the flavor, and gives it a little sweeter aspect, but it also increases the risk of browning it too much, which is the only way to screw this up. Besides that, it prevents getting any kind of color on the seafood.

By searing the shrimp first, you’ll get some nice caramelization, which I think really adds to the depth of flavor. Speaking of flavor, I can’t believe I’m giving away my caper brine secret; but I decided it’s just too good to not share. The little splash of salty goodness does something that’s easier to taste than explain.

Anyway, if you like shrimp and LOVE garlic, I hope you give this fast and delicious recipe a try soon. Enjoy!


Ingredients for 2 large or 4 small portions:
1 1/2 tbsp olive oil
1 pound shrimp
salt to taste
6 cloves garlic, minced fine
1/4 tsp red pepper flakes
2 tbsp cold butter, cut in 4 pieces
3 tbsp lemon juice
1 tbsp caper brine
1/3 cup chopped Italian parsley, divided
water as needed to thin sauce
Read More..

Sabtu, 14 September 2013

Clams in White Wine


I cooked this sometime back just for myself because no one at home like clams. Well, not when its cooked this way. They preferred it this way. I dont really enjoy eating alone. It makes food seems boring.


Anyway, I just have the plate of cooked clams in front of me, pick out all the shells, then have it with a bowl of rice. The sauce is sweet and I like it with rice. I like it more if I have someone to enjoy this with. *wink*

Ingredients:


  • 500g Soft Shell Clams, soaked in salted water for them to ‘split out’ the sand and brushed to clean the dirt on the shells

  • 4 glove Garlic , sliced

  • 4 tablespoon White Wine

  • 1 teaspoon oil

  • 1 bunch Basil Leaves

  • Salt to taste


How to do it:


  1. Heat wok with oil.

  2. Add in garlic and stir fry till fragrant.

  3. Add in the clams

  4. Stir fry till the clams have open. Throw away those which are not open (Do not force open. They are probably bad)

  5. Add in the wine and simmer till cooked.

  6. Throw in the basil leave and salt to taste.

  7. Stir fry for another 10 seconds.

  8. Dish and serve.


Note:

Try soaking them in 3 tablespoon of wine (Chinese cooking wine or white wine) after the clams are cleaned for half an hour. Mix around once a while, so every clams can get drunk. hehe ... Taste better.


  • Click HERE for printer-friendly version of an original recipe.


Read More..

Rabu, 11 September 2013

Pigs Tail in Tomato Soup 猪尾番茄汤

The butcher introduced me to pigs tail when I went to the market very late one day and all the ribs and bone meant to make soup were sold out.


Its even better for those who enjoys eating the chewy skin. I like it because the soup is as sweet and much more clearer than if I were to use ribs or bones. Surprisingly, the soup is not oily as I thought it will be.


Ingredients:

  • 2 Pigs tail, chopped into smaller pieces

  • 1 litre Water

  • 3 big ripe Tomatoes

  • 1/2 Carrot, shredded or diced

  • 1/2 Onion, shredded or diced

  • Salt to taste

How to do it:

  1. Blanch the pigs tail.

  2. Add it into a pot of water and bring to boil.

  3. Reduce to a simmer when water starts to boil.

  4. Slit an X on the skin of tomatoes.

  5. Add tomatoes in a pot of water and bring to a boil.

  6. Remove and plunge in cold water.

  7. Remove the skin and dice the tomato.

  8. Add tomato, carrot and onion an hour after simmering of the pigs tail.

  9. Bring to a boil and reduce to simmer for another one to two hours. Longer is you are eating the pigs tail and prefer it less tough.

  10. Add salt to taste.

  11. Serve.


☆ Click HERE for the printer-friendly version of the original recipe.


Read More..

Selasa, 10 September 2013

Egg in Toast 土司蛋


Last month was examination month. Then we went for a short holiday when school closed for holidays. Hence the lack of post (I just realised that there isnt any post last month). That and the fact that Im using my husbands (work) laptop now instead of our desktop. However, photos are all still being loaded in the desktop. Lots of work just to get a post out and I grew lazy to update :P


I will still try to not to be lazy and post more often :P  Heres a quick one for a start.


Im sure many have try making this before. I used to do this on a frying pan but I didnt like the results. The bottom sometimes get burn and worst, the eggs not even cooked well on the top.


Quite sometime back I decided to do this using the oven instead and we all loved the results. The bread tasted better as you can spread it with butter or for my case, Garlic Spread. The egg is cooked just right and the best of all, the bottom of the bread is not burned either.


Try this if you have an oven. This is how I did it:


Ingredients:


  • 1 slice Thick Bread

  • 1 cold 60g Egg

  • Butter or Garlic Spread


How to do it:


  1. Use a cookie cutter to cut out a hole in the middle of the bread.

  2. Spread butter or garlic spread on the top and the inside of the cut out hole.

  3. Place on a piece of baking paper. Im using Glad baking paper hence no greasing is required, You might have to grease light if you are using the normal baking paper.

  4. Crack egg into the hole.

  5. Toast in preheated oven at 200c for 3mins.

  6. Reduce temperate to 180c and continue to toast for 4mins.

  7. Remove from baking paper and serve.


Note:


  • The first toasting using higher temperature is to set the egg a little so the bread at the bottom doesnt absorb too much of the egg.

  • The second toasting using a lower temperature is to cook the egg further to desire doneness.

  • Every oven work differently. If you find your bread getting too brown after the first toasting, you can shield the bread using a foil tent.

  • Alternatively, you can lower the temperature and toast it longer.

  • If you cant get thick bread, use regular thickness bread with a smaller egg. This is to prevent the egg from over-flowing from the hole.


Read More..

Sabtu, 07 September 2013

Fried Rice in Egg Pocket 蛋包饭


This is one of those days that mummy becomes lazy and doesnt wish to do much cooking. It will always be simple one pot dinner. In this case, its fried rice.


The kids seldom complain about fried rice because I always use their favourite ingredients to cook it. I cooked todays fried rice with french beans, crab-stick, tofu fish-cake and dried scallops. I seasoned it with fish sauce, salt and a little chicken powder. And of course with lots of roasted garlic.


The fried rice is served in an egg pocket. It is very easy to do it. Just cook an beaten egg in an oiled frying pan (to prevent it from sticking and not to fry it). Spread it as much as you can but not too thinly. Remove the egg crepe when it is cooked. You dont have to flip it to the other side during cooking.


Fit the egg crepe in a small bowl, eg. rice bowl. Make sure the egg crepe touches the bottom of the bowl. It is better to have egg crepe hanging out of the bowl. You will find out why as you read on. Next, scoop some fried rice into the bowl (where the egg crepe is) to the rim. Now, fold the excess egg crepe over the rice. It may not necessary cover all the rice, just some part of it. Place a plate over the bowl and flip it over. Remove the bowl and viola!


You may wish to decorate or write using tomato sauce or any other sauce on it or simply slice it like me before serving.

Read More..

Senin, 26 Agustus 2013

Endomela ice cream shop in Akko Israel and a recipe for a wonderful apricot sorbet

Apricot sorbet / Aprikoosisorbett 
Youll find the recipe for this wonderfully aromatic and flavoursome apricot sorbet at the end of this post.  

Endomela is a play of three Hebrew words, Ein-Dome-La. The meaning? "Similar to none" or "Unlike no other". This is the name of a small ice cream parlour in Akko (known as Acre in English), a small town in the Western Galilee region of northern Israel. Akko was first mentioned on the tribute-lists of pharaoh Thutmose III in the 16th century BC, and is considered to be one of the oldest continuously inhabited settlements in this part of the world. A place with history indeed.

We visited Akko in the midday heat in the middle of the hot Israeli summer, so it was hard to grasp that the city is a home to some 45 thousand inhabitants. I guess that most of them were hiding in the safety of their cool and possibly air-conditioned homes and not wandering around the streets.

We were in Akko for a reason, of course. As we were exploring the culinary delicacies Israel has to offer, we had arrived to have a light lunch at a famous seafood restaurant URI BURI, meet the man behind the restaurant, Uri (Jeremias) Buri (pictured just below), visit his ice cream shop and enjoy a private tour of his recently opened beautiful boutique hotel Efendi and finish with a "light" tapas-style lunch at the hotel restaurant. Ill write about the fish restaurant and the hotel another time, today Ill give you a peek into his ice cream shop, the smartly-named Endomela.

Uri Buri (Uri Jeremiah) & me at his Endomela ice cream parlour. Akko, Israel.

Heres Uri Jeremias aka Uri Buri and me in front of his ice cream shop in Akko. American journalist Eric Westervelt described Uri Jeremias in his article for NPR.org as having stepped out of a Tolkien novel, with "his thick, long, elfish beard, ample paunch and mischievous smile". My 3,5 year old daughter is convinced that I was served ice cream by Santa Claus/Father Christmas himself :)

Uri (Jeremias) Buri had been making and serving ice cream at this fish & seafood restaurant for years, but as the restaurants kitchen is tiny, he had to move out his ice cream business into separate premises. He opened Endomela within a short walking distance from his restaurant just over a year ago. In addition to a number of sweet sorbets, ice creams and frozen yoghurts, he also makes some intriguing savoury combinations. We had a taste of this wasabi-sorbet, served with smoked salmon, as well of arak-flavoured sorbet destined as a palate-cleanser between various fish courses at his restaurant. 

Endomela, Akko/Acre, Israel

Uri scooping some of his lovely ice cream for us. (Photo by Noa Magger). We got to sample pretty much all the available flavours.

Endomela, Akko/Acre, Israel
Endomelas ice cream selection. (Photo by Noa Magger).

All ice cream is made at the premises and in small batches. At the time of our visit, they were churning a very refreshing pineapple sorbet. My very favourite one was Endomelas mint ice cream - so fresh and minty, definitely not your regular beach-front chocolate and mint concoction (you can see it on the right on the photo above). Uri told us he uses a combination of spearmint "Nana" (Mentha spicata, Israelis call it sweet mint or nana) and the highly aromatic Emperors mint or Roman mint (Micromeria sp)  to achieve the immensely refreshing and bright minty flavour.

The runner-up was Endomelas apricot sorbet. Yet pretty much everything else we tried was wonderful as well - cardamom ice cream, passionfruit sorbet, halva ice cream, lime and poppyseed frozen yoghurt - you name it.

Ive made apricot ice cream before, but not apricot sorbet, and thats what I decided to replicate at home first. As the reigning king of all things ice cream and sorbet, David Lebovitz, was also taking part in our trip to Endomela, I decided to use his recipe as a base. I know David provides his recipes both in Imperial and Metric, but his starting point is still the pound and not a kilo, so I did some minor revisions (if Id ask for 900 grams of apricots or 110 grams of chocolate chips in a store, Id get very weird looks. While these amounts would make perfect sense to someone whos grown up with pounds and ounces, then 900 grams (2 pounds) of apricots and 110 grams (1/4 of a pound) of chocolate would make perfect sense. For us, its a weird 100 grams less than a kilo and a funny 10 grams more than 100 grams, if you know what I mean). I also reduced the amount of sugar just a tiny bit, as the apricots I was using were very sweet and very ripe (ripeness and the amount of fruit sugar are related, you see).

French apricots, Marche de Saint-Antoine, Lyon
The Bergeron apricots @ Marche de Saint-Antoine, Lyon, France. August 2009
 
My favourite apricots for making all kinds of desserts are the French Bergeron ones. This time I used a lovely Spanish alternative - dark orange, very sweet and just a perfectly slightly acidic. You may add more sugar or a dash of lemon juice to the sorbet mix, depending on the type of apricots youre using.

Apricot Sorbet
Slightly adapted from David Lebovitzs excellent book The Perfect Scoop
Makes about 1 litre

Apricot sorbet / Aprikoosisorbett

1 kg very ripe apricots (thats just over 2 lbs)
250 ml/1 cup water
200 ml/170 grams caster sugar (thats 1 cup minus 3 level Tbsp)
0.5 tsp vanilla extract

Split the apricots in half, remove the stones, and cut each half into thirds.
Place the apricot pieces and water in a medium saucepan, cover. Cook over medium heat for about 10-15 minutes, stirring occasionally, until apricots are softened and begin to fall apart.
Remove from the heat, stir in the sugar and let the mixture cool to room temperature.
Once cool, pureé the mixture in a food processor or blender until smooth. Season with vanilla. Cover and chill thoroughly in the refrigerator, preferably overnight.
Freeze the mixture in your ice cream maker according to the manufacturer’s instructions.

Similar posts:
Erin Zimmer of Serious Eats writes about Endomela: Snapshots from Israel: Uri Buri and his ice cream.
Other posts about my trip to Israel.
Other ice cream and sorbet recipes here on Nami-Nami.
More ice cream and sorbet recipes on David Lebovitzs blog.

* Disclaimer: I spent six days in Israel in late June/early July as a guest of a non-profit social start-up Kinetis, more specifically their Vibe Israel programme. This particular trip hosted five international food bloggers and writers, introducing them to the multifaceted and pluralist Israeli culture and cuisine. Visit to Uri Buri restaurant, the Efendi Hotel and the adjacent ice cream parlour Endomela in Akko/Acre in the Western Galilee region of northern Israel was part of that trip.
Read More..

Kamis, 15 Agustus 2013

Icelandic cookbooks in English Cool Dishes and Cool Cuisine

There are a number of Icelandic cookbooks available in English, most of them published in Iceland and aimed at the tourist market. Most are printed on heavy, glossy paper and some have gorgeous colour photographs in them, both of which makes them expensive. Buying one for the equivalent of 50 US Dollars or more and then discovering it isnt what you were looking for is an expensive mistake. Therefore I decided to review as many of them as I could get my hands on, to make it a little easier to decide which one to invest in.

Not all of the Icelandic cookbooks in the book stores are available from the library. I will stick to the ones I could get from the library, as I have been able to read them all the way through.

First up are Cool Cuisine and Cool Dishes, which is a baby version of the former. They were written by Icelandic food writer Nanna Rögnvaldardóttir, with photographs by Gísli Egill Hrafnsson and published by Vaka-Helgafell in 2004.

Photobucket - Video and Image Hosting

Photobucket - Video and Image Hosting


These books combine gorgeous food photography with Icelandic recipes, most of which are traditional, although some are more traditional than others. By that I mean that there are recipes in the books that go back over a century, side by side with recipes that are less than 20 years old. A few are new, inspired by Icelandic raw materials.

You cant go wrong with these books as souvenirs for yourself or as gifts for a true food lover. Unlike some of the other Icelandic cookbooks I looked at, they are purely about the food, and are representative of what Icelanders really eat. You will not find fermented shark in there, nor sheeps heads or pressed sheeps testicles, but some of the old traditional food is in there, like smoked lamb (only how to cook it, not how to smoke it) blood pudding and halibut soup with prunes.

Cool Cuisine is 147 pages long and has some 92 recipes, more if you count separately the dishes that come with recipes for side dishes.

Cool Dishes is 72 pages and the recipes number 42. All the recipes in this book are found in the other, and all of what I would call the necessary recipes are in this one.

Verdict:
Of the Icelandic cookbooks I have been looking at, these two are definitely the best buys if you are looking for nice foodie coffee table books that are still useful as cookbooks.

Cost:
I checked the prices in the Penninn book store, which are representative of the prices you can expect to pay for these books. They may cost more in tourist shops.

As of the time of writing Cool Cuisine costs 2290 kr. and Cool Dishes costs 920 kr.

Practical information:
All the measurements in the books are in metric, including the teaspoons and tablespoons, and the temperatures are given in centigrade (Celcius).
Read More..