Pin It First of all, sorry for not being able to update more posts for the past few weeks as I was very busy with work, upcoming events as well as my boys school term examination. But despite of all those busy days, we also starts to enjoy making our daily Handmade Bread(Part I, HERE) which I would like to share with you some of the modified recipes that I have tried and tested.
When it comes to Handmade Bread, I think the most difficult part will be on the mixing and kneading of the dough. Personally I find it quite tedious to knead till the stretchable membrane stage which sometime takes about 20 - 30 minutes using hand instead of mixer or bread machines. But these hard work will payoff when your get to see your soft and fluffy bread that is well-received by the family. As for those who still cannot achieve that stretchable stage for your dough or having problem/unsuccessful Bread even though you follow all the steps to the dot, please do not give out. I am sure with more practice and proper guidance from those of your friends who had succeed, you too will be able to overcome the problem soon.
HOKKAIDO MILK LOAF
Pin It I still remember vividly, a few years ago this Hokkaido Milk Bread(北海道牛奶土司) is one of the popular bread recipes circulate among bakers and I first notice this recipe at Angies Recipes HERE which using a different method. And I have never thought after few years later, I would able to try out this popular bread using Tangzhong(烫种) method.
Although we might not be able to get hold of Hokkaido Milk to make this milk bread but definitely with any brand of full-cream fresh milk that we have in the local supermarket we can also bake a similar milk bread/bun that is soft, fluffy and fragrant to taste. And if you love anything with "milk" taste, this is sure to be a "MUST TRY" recipe for you.
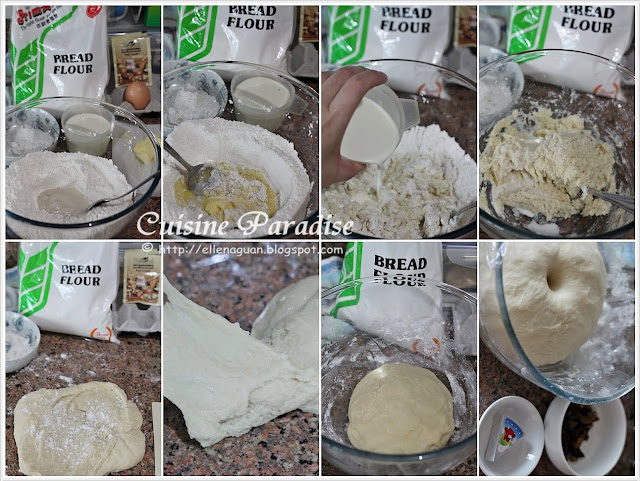 Recipe adapted from Christines Recipes, HERE.
Ingredients: (makes 2 loaf of bread, 17cm x 8cm x 6cm)
220g Bread Flour
50g Extra Bread Flour, set aside for kneading
50g Caster Sugar
3g Salt
1 Tablespoon Milk Powder
5g Instant Yeast
92g Tangzhong(烫种)
30ml Beaten Egg
50ml Whipping Cream
30ml Fresh Milk
25g Unsalted Butter, soften
Toppings:
1 Tablespoon Dried Cranberry And Raisin Mixture
1/2 Tablespoon Mini Chocolate Chips
1 Laughing Cow Cheese Wedge

2. Make a well in the center stir in wet ingredients such tangzhong, beaten egg and soft butter then follow by milk till it form a sticky dough.
3. Next turn the sticky dough out on to lightly floured surface. Stretch the dough by pushing the front half away with one hand, knead and constantly dust with the extra bread flour that is set aside.
4. Fold the stretched part of the dough back on itself, give it a quarter turn and repeat for 15 - 20 minutes, until the dough has been turned full circle several times and is a smooth and elastic ball. (Knead until stretchable and pass the window panel consistency)
5. Place the kneaded dough back into the lightly floured mixing bowl and leave it in a warm place to prove for about 45 minutes to an hour or until the dough has doubled in size.
6. Test your proofed dough by pushing your floured finger deep into the risen dough whereby it will leave an indentation that does not spring back.
7. Punch the risen dough with your fist to deflate it, re-shape the dough into oblong shape and divide it into 4 equal portion and let it rest for 10 minutes.
8. Roll out each portion of the dough with a rolling pin into an oval shape. Fold 1/3 from right and left edge to the middle and press down. Turn seal downward.
9. Roll flat and stretch to about 15 - 20cm in length, scatter with desire toppings and with roll from the top far end towards you. With seal facing down place in the loaf tins and repeat the same procedure to the next 3 portions.
10. Prove doughs for another 45 minutes or at least double the original size. Brush dough with egg wash and bake in pre-heated 175 oven for about 20 - 25 minutes depending on the size of the loaf/bun.
11. Remove loaf IMMEDIATELY from the pan and leave to cool for at least 30 minutes before slicing.
BAMBOO CHARCOAL AND MILK LOAF
Pin It Get this idea from a bread post that I saw from Cathys Joy website on her "Moo Moo Bread". Initally I was thinking about making something similar to hers but since we are using a totally different recipes, I ended up having a checker design rather than moo moo. This is the 1st time I am using 2 coloured dough and I think I have sort of over knead it as the texture seems to be a bit dry after a few hours later. But overall it still taste good with that extra dose of almond flakes on top.
 Ingredients: (makes 1 loaf)
135g Bread Flour
*40g Extra Bread Flour, set aside for kneading
5g Milk Powder
3g Instant Dry Yeast
30g Sugar
1/8 Teaspoon Salt
30ml Beaten Egg
60g Tangzhong(烫种)
60ml Fresh Milk
15g Unsalted Butter, soften
Colour Dough:
3/4 Teaspoon Bamboo Charcoal Powder
Toppings:
Egg Wash
Almond Flakes

2. Divide dough(about 400)into 2 portions weighing, 200g each separately.
3. Slowly knead Bamboo Charcoal Powder into 1 portion of the dough (200g) for a few minutes till colour is even.
4. Place both the kneaded doughs into two lightly floured mixing bowl and leave it in a warm place to prove for about 45 minutes to an hour or until the dough has doubled in size.
5. Test your proofed dough by pushing your floured finger deep into the risen dough whereby it will leave an indentation that does not spring back.
6. Punch the risen doughs with your fist to deflate it, re-shape the two doughs into oblong shape and cut each dough into 5 equal portion and let it rest for 10 minutes.
8. Roll each individual portion of the doughs into an oval shape about 10cm x 5cm, roll the flatten dough towards your direction starting from top down. Further divide the rolled dough into half and set aside. Repeat the same process for the remaining doughs.
9. Arrange the cut doughs(10 plain doughs and 10 black doughs) into a grease loaf tin in alternate colours of two layers. Prove the loaf for about 45 minutes or double its size.
10. Brush dough with egg wash, scatter some almond flakes and bake in pre-heated 175 oven for about 20 minutes. Remove loaf IMMEDIATELY from the pan and leave to cool for at least 30 minutes.
PUMPKIN CINNAMON BUN
 Since I have some left over pumpkin in the fridge from making pumpkin soup. I decided to try out this Pumpkin Cinnamon Bun from one of the Chinese website known as "袅袅烘焙香". Since we are using a different cooked dough recipe, I have changed a bit on the original recipe which I replaced her "scalded-dough" to water roux method and cold water to cold milk.
Indeed this is a very sticky dough to knead till smooth and elastic as we have added to 3 liquid items such as water roux, mashed pumpkin and cold milk. I think out of the doughs that I have kneaded so far, this is the most difficult dough to knead as it took me about 30 minutes or more. And sad to say the final result is not very good, from the step-by-step photos below you will notice that the 2nd proofed dough seems to sink after the egg wash and the surface texture became crumpled too.
 Recipe adapted from 茄子, 袅袅烘焙香, Pumpkin Bread HERE.
Ingredients: (makes 6 buns)
170g Bread Flour
30g Extra Bread Flour, set aside for kneading
30g Caster Sugar
1/8 Teaspoon Cinnamon Powder
1 Tablespoon Milk Powder
4g (1 Teaspoon) Instant Yeast
65g Tangzhong(烫种)
60g Mashed Pumpkin
75ml Cold Milk
30g Butter, soften
Topping:
Sesame Seeds, optional
![]()
2. Make a well in the center stir in wet ingredients such tangzhong, mashed pumpkin and cold milk till it form a sticky dough before mixing in the soft butter till well combined.
3. Next turn the sticky dough out on to lightly floured surface. Stretch the dough by pushing the front half away with one hand, knead and constantly dust with the extra bread flour that is set aside.
4. Fold the stretched part of the dough back on itself, give it a quarter turn and repeat for 15 - 20 minutes, until the dough has been turned full circle several times and is a smooth and elastic ball. (Knead until stretchable and pass the window panel consistency)
5. Place the kneaded dough back into the lightly floured mixing bowl and leave it in a warm place to prove for about 45 minutes to an hour or until the dough has doubled in size.
6. Test your proofed dough by pushing your floured finger deep into the risen dough whereby it will leave an indentation that does not spring back.
7. Punch the risen dough with your fist to deflate it, re-shape the dough into oblong shape and divide it into 6 equal portion and let it rest for 10 minutes.
8. Roll each portion of the doughs into an oval shape about 12cm x 5cm, roll the flatten dough towards your direction starting from top down. Place the seal side facing down on a greased tin. Repeat the same process for the remaining 5 doughs.
9. Prove prepared buns for about 45 minutes or double its size. Brush dough with egg wash and bake in pre-heated 175 oven for about 20 minutes.
10. Remove loaf IMMEDIATELY from the pan and leave to cool for at least 30 minutes.
PANDA BREAD
 Finally gets to lay my hand in trying out this cute Panda Bread which I adore very much.The original recipes from the internet called for 3 different coloured dough to distinguish between the face, features and background. But here using my reliable "Milk Bread" recipe which we love, I only used black and plain dough for this design.
But as you can see from the photos below I didnt quite get the wrapping steps correct which cause my Panda Bread to be out of shapes for its ears and eyes.
 Recipe adapted from Not Quite Nigella, HERE.
Ingredients: (makes 1 loaf, 20cm x 10cm x10cm high)
220g Bread Flour
*50g Extra Bread Flour, set aside for kneading
50g Caster Sugar
3g Salt
1 Tablespoon Milk Powder
5g Instant Yeast
92g Tangzhong(烫种)
30ml Beaten Egg
50ml Whipping Cream
30ml Fresh Milk
25g Unsalted Butter, soften
Colour Dough:
100g Knead Dough
1/2 Teaspoon Bamboo Charcoal Powder

2. Divide dough(about 540g)into 2 portions weighing, 100g and 440g separately.
3. Knead 1/2 Teaspoon of Bamboo Charcoal Powder into the 100g of dough for a few minutes till colour is even.
4. Place both the kneaded doughs into two lightly floured mixing bowl and leave it in a warm place to prove for about 45 minutes to an hour or until the dough has doubled in size.
5. Punch air out of dough and prove for another 10 - 15 minutes.
6. 1st Layer: Use 90g plain dough for the face and 2 pieces of 30g bamboo charcoal dough for the eyes and fill the hollow of the eyes with 30g plain dough. (refer to the photo above)
7. Roll another 100g of plain dough over the 1st layer of patterned dough.
8. 2nd Layer: Divide the remaining bamboo charcoal dough into 2 pieces (20g each) for the ears and place another 70g of plain dough to fill up the hollow between the ears. (refer to the photo above, last row)
9. Wrap the rest of the plain dough all around the patterned dough, place dough into a well-greased loaf pan and cover it with a lid and prove for 50 – 60 minutes or till double its size.
10. Brush dough with egg wash and bake in pre-heated 175 degree oven for about 20 - 25 minutes. Remove loaf IMMEDIATELY from the pan and leave to cool for at least 30 minutes before cutting.
WHOLEMEAL CRANBERRY WITH MULTI-GRAIN LOAF
 I love Wholemeal Bun/Bread with either assorted nuts, dried fruits or multi-grain toppings. So making this wholemeal loaf is something which I look forward to at least once or twice a week. Before attempting this recipe, I have read a few posts mentioning that wholemeal dough is rather more tricky to handle by hand compared to plain dough. So after much hesitation, I finally get myself ready to make my favourite Wholemeal Cranberry With Multi-Grain Loaf.
Although the dough was rather sticky but thank God I already have some experience in kneading the pumpkin dough so I was rather mentally prepared to knead longer for this. To my surprised the dough became more and more manageable after about 15 minutes or kneading and finally it works out after almost 30 minutes of turning, folding, stretching and turning. And I am glad that I have made the decision to try out this bread as it is so light, fluffy and delicious with those dried fruits and multi-grains hidden in between the layer of the wholemeal loaf with a slight crisp outer crust. MUST TRY!
 Ingredients: (makes 1 loaf of bread, cm x 8cm x 6cm)
110g Bread Flour
*30g Extra Bread Flour, set aside for kneading
100g Wholemeal Flour
5g Instant Yeast
30g Caster Sugar
60g Tangzhong(烫种)
30ml Beaten Egg
70ml Fresh Milk
25g Unsalted Butter, soften
Toppings:-
60g Chopped Dried Cranberry And Raisin
1 Tablespoon Multi-grain Toppings

2. Punch the risen dough with your fist to deflate it, re-shape the dough into oblong shape and divide it into 4 equal portion(about 115g each) and let it rest for 10 minutes.
3. Roll each portion of the doughs into an rectangle shape about 15cm x 5cm, scatter each dough with some chopped cranberry and raisin roll the flatten dough towards your direction starting from top down.
4. With the seal side facing up, flatten and into another rectangle then roll dough towards your direction starting from top down again. With seal side facig down, place dough in grease loaf tin for 2nd round of proofing (around 45 - 60 minutes) or until double in size.
5. Repeat steps 3 and 4 for the remaining 3 doughs.
6. Brush final dough with egg wash and scatter evenly with multi-grain and bake in pre-heated 180 degree oven for about 25 minutes.
7. Remove loaf IMMEDIATELY from the pan and leave to cool for at least 30 minutes before cutting.
 Lastly I hope that you wont get bored with this 2nd "lengthy" post on bread making but instead this will strengthen/boost up your confident in making Homemade Bread for your family which you gets to control what you like for your ingredients to suit their taste buds.
For more PHOTOS on these HANDMADE BREAD, please refer to the facebook link HERE.

Read More..

When it comes to Handmade Bread, I think the most difficult part will be on the mixing and kneading of the dough. Personally I find it quite tedious to knead till the stretchable membrane stage which sometime takes about 20 - 30 minutes using hand instead of mixer or bread machines. But these hard work will payoff when your get to see your soft and fluffy bread that is well-received by the family. As for those who still cannot achieve that stretchable stage for your dough or having problem/unsuccessful Bread even though you follow all the steps to the dot, please do not give out. I am sure with more practice and proper guidance from those of your friends who had succeed, you too will be able to overcome the problem soon.
HOKKAIDO MILK LOAF
Pin It

Although we might not be able to get hold of Hokkaido Milk to make this milk bread but definitely with any brand of full-cream fresh milk that we have in the local supermarket we can also bake a similar milk bread/bun that is soft, fluffy and fragrant to taste. And if you love anything with "milk" taste, this is sure to be a "MUST TRY" recipe for you.
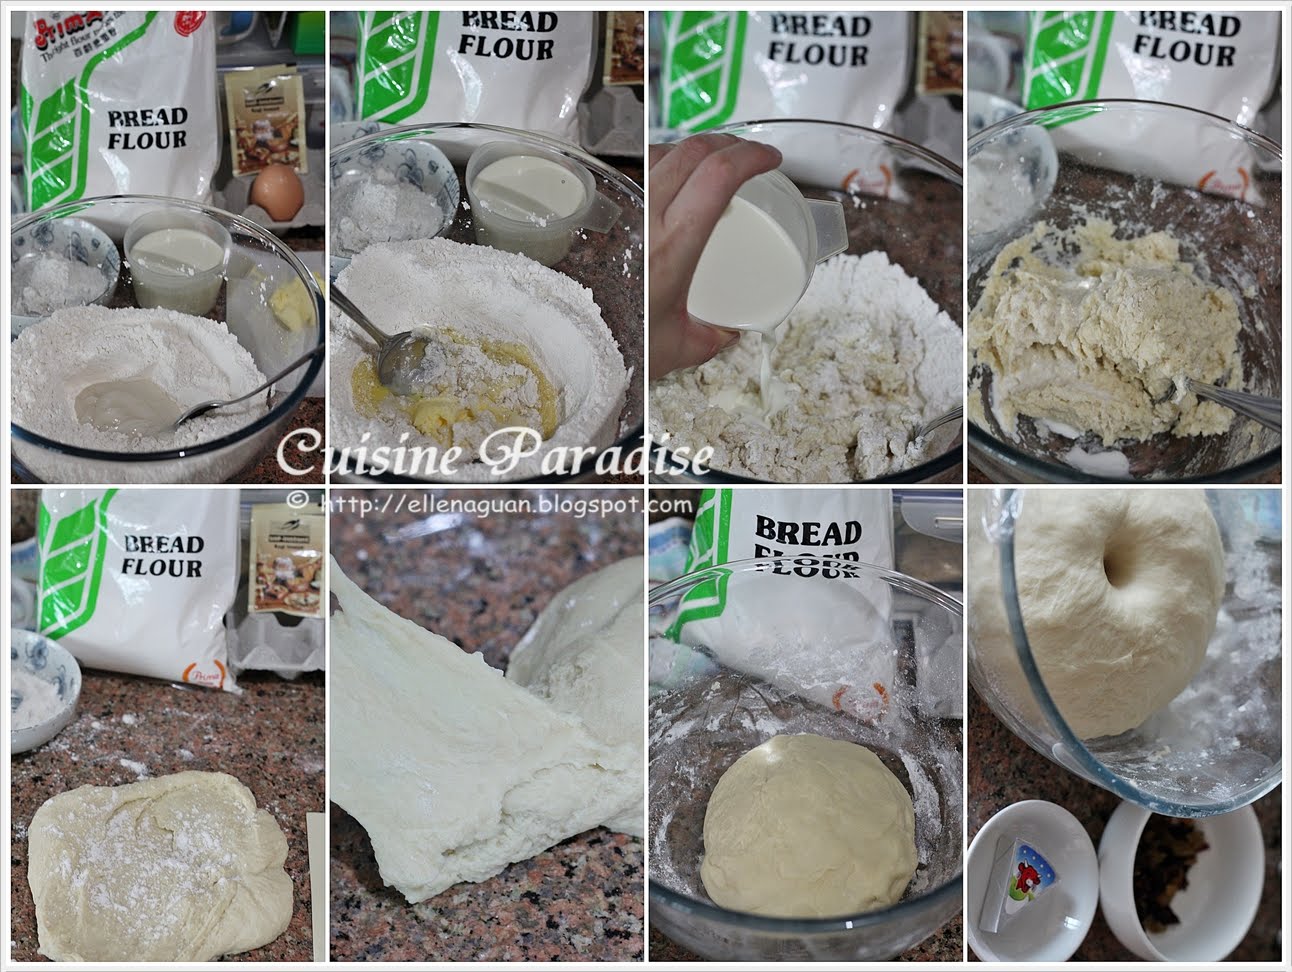
Ingredients: (makes 2 loaf of bread, 17cm x 8cm x 6cm)
220g Bread Flour
50g Extra Bread Flour, set aside for kneading
50g Caster Sugar
3g Salt
1 Tablespoon Milk Powder
5g Instant Yeast
92g Tangzhong(烫种)
30ml Beaten Egg
50ml Whipping Cream
30ml Fresh Milk
25g Unsalted Butter, soften
Toppings:
1 Tablespoon Dried Cranberry And Raisin Mixture
1/2 Tablespoon Mini Chocolate Chips
1 Laughing Cow Cheese Wedge

Method:-
1. Combine all dry ingredients such as flour, milk powder, salt, sugar and instant yeast in a bowl and mixed well.2. Make a well in the center stir in wet ingredients such tangzhong, beaten egg and soft butter then follow by milk till it form a sticky dough.
3. Next turn the sticky dough out on to lightly floured surface. Stretch the dough by pushing the front half away with one hand, knead and constantly dust with the extra bread flour that is set aside.
4. Fold the stretched part of the dough back on itself, give it a quarter turn and repeat for 15 - 20 minutes, until the dough has been turned full circle several times and is a smooth and elastic ball. (Knead until stretchable and pass the window panel consistency)
5. Place the kneaded dough back into the lightly floured mixing bowl and leave it in a warm place to prove for about 45 minutes to an hour or until the dough has doubled in size.
6. Test your proofed dough by pushing your floured finger deep into the risen dough whereby it will leave an indentation that does not spring back.
7. Punch the risen dough with your fist to deflate it, re-shape the dough into oblong shape and divide it into 4 equal portion and let it rest for 10 minutes.
8. Roll out each portion of the dough with a rolling pin into an oval shape. Fold 1/3 from right and left edge to the middle and press down. Turn seal downward.
9. Roll flat and stretch to about 15 - 20cm in length, scatter with desire toppings and with roll from the top far end towards you. With seal facing down place in the loaf tins and repeat the same procedure to the next 3 portions.
10. Prove doughs for another 45 minutes or at least double the original size. Brush dough with egg wash and bake in pre-heated 175 oven for about 20 - 25 minutes depending on the size of the loaf/bun.
11. Remove loaf IMMEDIATELY from the pan and leave to cool for at least 30 minutes before slicing.
BAMBOO CHARCOAL AND MILK LOAF
Pin It


135g Bread Flour
*40g Extra Bread Flour, set aside for kneading
5g Milk Powder
3g Instant Dry Yeast
30g Sugar
1/8 Teaspoon Salt
30ml Beaten Egg
60g Tangzhong(烫种)
60ml Fresh Milk
15g Unsalted Butter, soften
Colour Dough:
3/4 Teaspoon Bamboo Charcoal Powder
Toppings:
Egg Wash
Almond Flakes

Method:-
1. Refer Steps 1 to 4 of the Hokkaido Milk Loaf recipe above.2. Divide dough(about 400)into 2 portions weighing, 200g each separately.
3. Slowly knead Bamboo Charcoal Powder into 1 portion of the dough (200g) for a few minutes till colour is even.
4. Place both the kneaded doughs into two lightly floured mixing bowl and leave it in a warm place to prove for about 45 minutes to an hour or until the dough has doubled in size.
5. Test your proofed dough by pushing your floured finger deep into the risen dough whereby it will leave an indentation that does not spring back.
6. Punch the risen doughs with your fist to deflate it, re-shape the two doughs into oblong shape and cut each dough into 5 equal portion and let it rest for 10 minutes.
8. Roll each individual portion of the doughs into an oval shape about 10cm x 5cm, roll the flatten dough towards your direction starting from top down. Further divide the rolled dough into half and set aside. Repeat the same process for the remaining doughs.
9. Arrange the cut doughs(10 plain doughs and 10 black doughs) into a grease loaf tin in alternate colours of two layers. Prove the loaf for about 45 minutes or double its size.
10. Brush dough with egg wash, scatter some almond flakes and bake in pre-heated 175 oven for about 20 minutes. Remove loaf IMMEDIATELY from the pan and leave to cool for at least 30 minutes.
PUMPKIN CINNAMON BUN

Indeed this is a very sticky dough to knead till smooth and elastic as we have added to 3 liquid items such as water roux, mashed pumpkin and cold milk. I think out of the doughs that I have kneaded so far, this is the most difficult dough to knead as it took me about 30 minutes or more. And sad to say the final result is not very good, from the step-by-step photos below you will notice that the 2nd proofed dough seems to sink after the egg wash and the surface texture became crumpled too.

Ingredients: (makes 6 buns)
170g Bread Flour
30g Extra Bread Flour, set aside for kneading
30g Caster Sugar
1/8 Teaspoon Cinnamon Powder
1 Tablespoon Milk Powder
4g (1 Teaspoon) Instant Yeast
65g Tangzhong(烫种)
60g Mashed Pumpkin
75ml Cold Milk
30g Butter, soften
Topping:
Sesame Seeds, optional

Method:-
1. Combine all dry ingredients such as flour, milk powder, sugar and instant yeast in a bowl and mixed well.2. Make a well in the center stir in wet ingredients such tangzhong, mashed pumpkin and cold milk till it form a sticky dough before mixing in the soft butter till well combined.
3. Next turn the sticky dough out on to lightly floured surface. Stretch the dough by pushing the front half away with one hand, knead and constantly dust with the extra bread flour that is set aside.
4. Fold the stretched part of the dough back on itself, give it a quarter turn and repeat for 15 - 20 minutes, until the dough has been turned full circle several times and is a smooth and elastic ball. (Knead until stretchable and pass the window panel consistency)
5. Place the kneaded dough back into the lightly floured mixing bowl and leave it in a warm place to prove for about 45 minutes to an hour or until the dough has doubled in size.
6. Test your proofed dough by pushing your floured finger deep into the risen dough whereby it will leave an indentation that does not spring back.
7. Punch the risen dough with your fist to deflate it, re-shape the dough into oblong shape and divide it into 6 equal portion and let it rest for 10 minutes.
8. Roll each portion of the doughs into an oval shape about 12cm x 5cm, roll the flatten dough towards your direction starting from top down. Place the seal side facing down on a greased tin. Repeat the same process for the remaining 5 doughs.
9. Prove prepared buns for about 45 minutes or double its size. Brush dough with egg wash and bake in pre-heated 175 oven for about 20 minutes.
10. Remove loaf IMMEDIATELY from the pan and leave to cool for at least 30 minutes.
PANDA BREAD

But as you can see from the photos below I didnt quite get the wrapping steps correct which cause my Panda Bread to be out of shapes for its ears and eyes.

Ingredients: (makes 1 loaf, 20cm x 10cm x10cm high)
220g Bread Flour
*50g Extra Bread Flour, set aside for kneading
50g Caster Sugar
3g Salt
1 Tablespoon Milk Powder
5g Instant Yeast
92g Tangzhong(烫种)
30ml Beaten Egg
50ml Whipping Cream
30ml Fresh Milk
25g Unsalted Butter, soften
Colour Dough:
100g Knead Dough
1/2 Teaspoon Bamboo Charcoal Powder

Method:-
1. Refer Steps 1 to 4 of the Hokkaido Milk Loaf recipe above.2. Divide dough(about 540g)into 2 portions weighing, 100g and 440g separately.
3. Knead 1/2 Teaspoon of Bamboo Charcoal Powder into the 100g of dough for a few minutes till colour is even.
4. Place both the kneaded doughs into two lightly floured mixing bowl and leave it in a warm place to prove for about 45 minutes to an hour or until the dough has doubled in size.
5. Punch air out of dough and prove for another 10 - 15 minutes.
6. 1st Layer: Use 90g plain dough for the face and 2 pieces of 30g bamboo charcoal dough for the eyes and fill the hollow of the eyes with 30g plain dough. (refer to the photo above)
7. Roll another 100g of plain dough over the 1st layer of patterned dough.
8. 2nd Layer: Divide the remaining bamboo charcoal dough into 2 pieces (20g each) for the ears and place another 70g of plain dough to fill up the hollow between the ears. (refer to the photo above, last row)
9. Wrap the rest of the plain dough all around the patterned dough, place dough into a well-greased loaf pan and cover it with a lid and prove for 50 – 60 minutes or till double its size.
10. Brush dough with egg wash and bake in pre-heated 175 degree oven for about 20 - 25 minutes. Remove loaf IMMEDIATELY from the pan and leave to cool for at least 30 minutes before cutting.
WHOLEMEAL CRANBERRY WITH MULTI-GRAIN LOAF

Although the dough was rather sticky but thank God I already have some experience in kneading the pumpkin dough so I was rather mentally prepared to knead longer for this. To my surprised the dough became more and more manageable after about 15 minutes or kneading and finally it works out after almost 30 minutes of turning, folding, stretching and turning. And I am glad that I have made the decision to try out this bread as it is so light, fluffy and delicious with those dried fruits and multi-grains hidden in between the layer of the wholemeal loaf with a slight crisp outer crust. MUST TRY!

110g Bread Flour
*30g Extra Bread Flour, set aside for kneading
100g Wholemeal Flour
5g Instant Yeast
30g Caster Sugar
60g Tangzhong(烫种)
30ml Beaten Egg
70ml Fresh Milk
25g Unsalted Butter, soften
Toppings:-
60g Chopped Dried Cranberry And Raisin
1 Tablespoon Multi-grain Toppings

Method:-
1. Refer Steps 1 - 6 of the Pumpkin Cinnamon Loaf recipe above.(this wholemeal dough is very sticky compared to the rest, but just keep on knead and you will get the same smooth and elastic dough result)2. Punch the risen dough with your fist to deflate it, re-shape the dough into oblong shape and divide it into 4 equal portion(about 115g each) and let it rest for 10 minutes.
3. Roll each portion of the doughs into an rectangle shape about 15cm x 5cm, scatter each dough with some chopped cranberry and raisin roll the flatten dough towards your direction starting from top down.
4. With the seal side facing up, flatten and into another rectangle then roll dough towards your direction starting from top down again. With seal side facig down, place dough in grease loaf tin for 2nd round of proofing (around 45 - 60 minutes) or until double in size.
5. Repeat steps 3 and 4 for the remaining 3 doughs.
6. Brush final dough with egg wash and scatter evenly with multi-grain and bake in pre-heated 180 degree oven for about 25 minutes.
7. Remove loaf IMMEDIATELY from the pan and leave to cool for at least 30 minutes before cutting.

For more PHOTOS on these HANDMADE BREAD, please refer to the facebook link HERE.